As a frequent traveler and remote worker, I rely heavily on Virtual Private Networks (VPNs) to secure my internet connection and access geo-blocked content. However, I've also experienced the frustration of slow internet speeds and restricted access to local resources while using a VPN. That's where VPN split tunneling comes in.
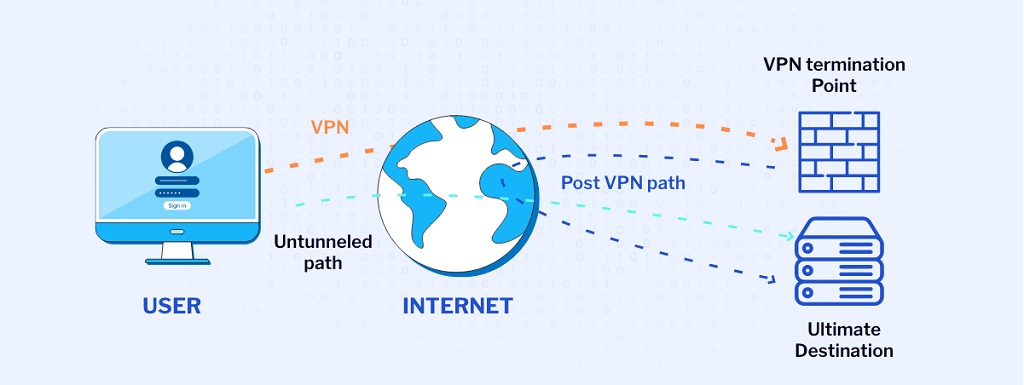
VPN split tunneling is a feature that allows you to route some of your internet traffic through the VPN while allowing other traffic to access the internet directly. This means that you can maintain the security and privacy of your online activities while still being able to access local resources, such as printers, network-attached storage (NAS), and other devices on your local network.
Why the Need for VPN Split Tunneling?
There is never only a single side to most technologies, and the same applies to VPN split tunneling. It offers distinct advantages and disadvantages for everyone. What's important is that you weigh the pros and cons against your usage case and needs.
VPN Split Tunneling Advantages

One of the most significant advantages of VPN split tunneling is that it can significantly improve internet speed and performance. When you use a VPN, all your internet traffic is routed through an encrypted tunnel to a remote server before reaching its destination. This process can slow down your connection and increase latency.
With split tunneling, you can selectively route only the traffic that needs encryption through the VPN. Thanks to selective routing, you can access local resources and websites that don't require a VPN connection directly without incurring the overhead of VPN encryption.
Another advantage of VPN split tunneling is that it can reduce network congestion and improve overall performance. When you use a VPN, all of your internet traffic goes through the same server, leading to congestion and slowing down your connection.
With split tunneling, you can route different types of traffic through different routes, optimizing your network traffic and avoiding bottlenecks.
VPN Split Tunneling Disadvantages
However, split tunneling also has its disadvantages. One of the most significant risks of split tunneling is that it can expose your internet traffic to security threats. When you split your internet traffic between the VPN and the local network, you create two separate routes for your traffic. The split can create security vulnerabilities if one of those routes is compromised, such as a malware-infected device on your local network.
Another disadvantage of split tunneling is that it can be more complex to configure and manage than a standard VPN connection. You must carefully select which traffic should be routed through the VPN and which should be allowed to bypass it, which can be challenging for some.
VPN Split Tunneling Configuration
Configuring VPN split tunneling can be different depending on the platform you are using. Here are some tips for configuring split tunneling on other operating systems:
Windows
In Windows, you can configure split tunneling using the built-in VPN client. To enable split tunneling, go to the VPN settings and click on the Properties button. Then, select the Networking tab and click on the Internet Protocol version 4 (TCP/IPv4) option.
Finally, click the Advanced button and uncheck the option “Use default gateway on remote network.” This will allow you to access local resources using the VPN for encrypted traffic.
MacOS
On a Mac, you can configure split tunneling using a third-party VPN client such as Tunnelblick or Viscosity. To enable split tunneling, you must create a custom routing table specifying which traffic to route through the VPN and which should bypass it.
This process can be more complex than on Windows, but plenty of tutorials and resources are available online to guide you.
Android
Split tunneling on Android can be enabled using the OpenVPN Connect app. After you've installed the app and connected to a VPN server, click on the three dots in the upper right corner of the app and select “Settings.”
Then, click on the “Advanced” tab and enable “Allow VPN only for selected apps.” This will allow you to choose which apps should use the VPN and which should be allowed to bypass it.
iOS
Split tunneling on iOS can also be enabled using the OpenVPN Connect app. After connecting to a VPN server, click the “Settings” button and select “General.” Scroll down to the “Split Tunnel” option and select “Enabled.”
You can then choose which apps should use the VPN and which should be allowed to bypass it.
Split Tunneling Best Practices
There are a few best practices to keep in mind to ensure the security and stability of your network. Here are some tips when implementing split tunneling;
Always use a reliable VPN provider: Choose a reputable one with strong encryption and a solid track record of protecting user privacy. I highly recommend NordVPN if security and privacy are your top VPN priorities.
Configure split tunneling carefully: Take the time to carefully select which traffic should go through the VPN and which should be allowed to bypass it. This way, you can avoid security vulnerabilities and optimize your network traffic.
Monitor your network traffic: Keep an eye on your traffic to ensure that all your internet traffic is routed correctly. If you notice any anomalies or suspicious activity, investigate immediately.
Keep your devices and software up-to-date: Ensure you keep your devices and software up-to-date with the latest security patches and updates to avoid security vulnerabilities.
Avoiding Security Risks When Using Split Tunneling
As mentioned earlier, one of the most significant risks of split tunneling is that it can expose your internet traffic to security threats. Here are some of the risks and mitigation strategies you should be aware of:
Malware Infections
If one of the devices on your local network has malware, it could compromise your entire network. That includes the traffic going through the VPN. To mitigate this risk, ensure you have up-to-date anti-virus software installed on all your devices and be vigilant about suspicious activity on your network.
Man-in-the-middle Attacks
If an attacker can intercept your local network traffic, they could compromise your network and steal sensitive data. To mitigate this MitM risk, use robust encryption protocols and keep your VPN software up-to-date with the latest security patches.
DNS leaks
If your VPN software is improperly configured, it could leak your DNS requests, allowing your ISP (Internet Service Provider) or other third parties to track your online activities. To mitigate this risk, make sure you choose a VPN provider that has strong DNS leak protection.
Common Issues With Split Tunneling
While VPN split tunneling can significantly benefit network performance and accessibility, it can also cause issues needing troubleshooting. Here are some common problems you may encounter:
DNS Resolution Issues
One of the most common issues with split tunneling is that it can cause DNS resolution issues, where your device cannot resolve domain names for local resources. You can fix this by manually configuring your DNS settings to point to your local DNS server.
Connectivity Issues
Sometimes, split tunneling can cause connectivity issues, where specific applications or services cannot connect to the internet or other devices on the network. You can resolve this by adding the affected applications or services to your VPN split tunneling settings list of allowed apps.
Network Conflicts
Sometimes, split tunneling can cause conflicts with other network configurations, such as firewalls or proxy servers. You can resolve these by temporarily disabling these configurations or adjusting your split tunneling settings to allow traffic to pass through them.
VPN Disconnects
Split tunneling can sometimes cause your VPN connection to drop or disconnect unexpectedly. You can fix this by adjusting your split tunneling settings to ensure all necessary traffic goes through the VPN tunnel.
Troubleshooting Tips for VPN Split Tunneling Issues
Following these troubleshooting tips, you can resolve common issues with split tunneling and ensure that your network performance and security are optimized.
- Check your VPN settings: Ensure you configure split tunneling settings correctly and that all necessary traffic goes through the VPN.
- Restart your devices: Sometimes, simply restarting your devices can resolve connectivity issues or other problems related to split tunneling.
- Check your network configuration: Make sure that you configure network settings correctly and that there are no conflicts with other network configurations, such as firewalls or proxy servers.
- Update your VPN software: Make sure that your VPN software is up-to-date with the latest security patches and updates, which can help resolve security vulnerabilities and other issues.
- Contact your VPN provider: If you're still experiencing issues with split tunneling, it may be helpful to contact your VPN provider for support and assistance.
3 VPNs That Offer Split Tunneling
Many VPN providers offer split tunneling as a feature, but here are three popular options:
NordVPN
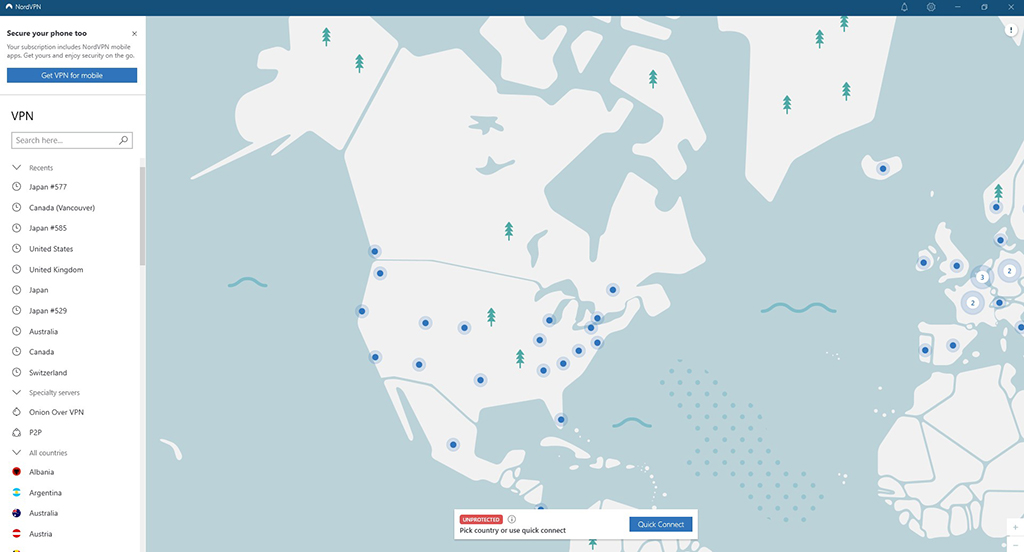
NordVPN offers split tunneling on its Windows, Mac, and Android clients. Users can route specific apps or websites through the VPN tunnel while allowing others to use the regular internet connection. NordVPN also offers advanced features such as double VPN and Onion over VPN for added security.
How to Use Split Tunneling With NordVPN
- Open the NordVPN app on your computer and log in to your account.
- Click on the “Settings” icon in the upper right corner of the app.
- In the Settings menu, select “General.”
- Scroll to the “Advanced Settings” section and click “Custom DNS.”
- Toggle the “Enable Custom DNS” switch to the “On” position.
- In the “Custom DNS” field, enter the IP address of your preferred DNS server. NordVPN recommends using their own DNS servers, which you can find listed on their website.
- Click on the “Auto-Connect” tab in the Settings menu.
- Toggle the “Split Tunneling” switch to the “On” position.
- In the “App Split Tunneling” section, select the applications you want to route through the VPN tunnel.
- In the “Website Exceptions” section, add any websites that you want to exclude from the VPN tunnel.
- Click on the “Save” button to apply your changes.
Surfshark
This VPN provider offers split tunneling on its Windows, Mac, Android, and iOS clients. Users can route specific apps or websites through the VPN tunnel while allowing others to use the regular internet connection. Surfshark also offers advanced features such as multi-hop VPN and ad-blocking for added privacy and security.
How to Use Split Tunneling With Surfshark
- Open the Surfshark app on your computer and log in to your account.
- Click on the “Settings” icon in the upper right corner of the app.
- In the Settings menu, select “Advanced.”
- Scroll down to the “Split tunneling” section and toggle the switch to the “On” position.
- By default, Surfshark will use a “WhiteList” split tunneling approach, which means that you will need to add specific applications or websites to the list for them to use the VPN. To add an application or website to the whitelist, click the “+” button and select the one you want to add.
- Click on the “Save” button to apply your changes.
ExpressVPN
This VPN provider offers split tunneling on its Windows and Mac clients. Users can route certain apps or websites through the VPN tunnel while allowing others to bypass it. ExpressVPN also offers a “smart location” feature that automatically selects the best server location based on your current location and network conditions.
How to Use Split Tunneling With ExpressVPN
- Open the ExpressVPN app on your computer and log in to your account.
- Click on the three horizontal lines in the upper left corner of the app to open the menu.
- Click on “Options” or “Settings” (depending on the version of the app you are using).
- In the Settings menu, select “General.”
- Scroll down to the “Split tunneling” section and click “Turn on split tunneling.”
- By default, ExpressVPN will use a “Policy-based” split tunneling approach, meaning you can define specific rules for which applications or websites should use the VPN. To create a new rule, click the “+” button and select whether you want to include an application or a website.
- Alternatively, you can choose an “App-based” split tunneling approach to select which specific applications should use the VPN. To use the app-based method, click the “App-based” tab and click the “+” button to add a new application.
- Once you've created your split tunneling rules, click the “Save” button to apply your changes.
Split Tunneling Can Boost Internet Speeds
VPN split tunneling can be a powerful tool for optimizing your network performance and accessing local resources while maintaining the security and privacy of your online activities. However, these advantages also come with some risks and complexities.
It is essential to configure and manage your split tunneling settings carefully. By following the best practices and mitigation strategies outlined in this article, you can enjoy the benefits of split tunneling while minimizing the risks.