Whether you're a digital nomad or a casual browser, you need to set up a VPN on your Mac. As Mac users, we're relatively safe from some threats. However, the security landscape is changing, and we must be more cautious about our digital activities.
That's where Virtual Private Networks, or VPNs, come into play. Mac users aren't exempt from the prying eyes of internet service providers (ISPs), hackers, and sometimes government agencies. Thankfully, it's easy to set up a VPN on your Mac, and there are more ways than one to get the job done.
Quick Summary
- Macs are pretty secure, but the Internet is an increasingly dangerous place. Using a VPN helps increase your privacy and security online.
- Method 1 – Dedicated VPN App: Most VPN services offer dedicated apps that simplify the setup process. After installing the app from the provider's website or the App Store, log in and connect to a server of your choice.
- Method 2 – Use Built-in macOS Settings: MacOS has a built-in VPN feature. It's simple simple to use but offers limited options in VPN protocol.
- Method 3 – Use OpenVPN App: You can use the OpenVPN Connect app if your VPN service supports the OpenVPN protocol. Download the app, import your VPN provider's OpenVPN configuration files, and connect to a server.
Let's start with the easiest method;
Method 1: Use a VPN App on Your Mac
Setting up a VPN on your Mac using a VPN app from a service provider is the most straightforward way to get started. These apps are designed with user-friendliness, so you don't have to be a tech wizard to navigate the process. Let's break it down step-by-step.
Step 1: Downloading the VPN App
First, you'll need to choose a reliable VPN service provider. A few things to consider when making your choice include the provider's reputation, the security protocols they use, the speed of their service, and of course, their privacy policy.
Our favorites include ExpressVPN, NordVPN, and CyberGhost, thanks to their robust security measures and a solid commitment to user privacy. Once you've chosen your provider, navigate to their website and look for the option to download their VPN client for Mac.
Some providers also offer their apps on the App Store. Either way, ensure you're downloading the app directly from the provider or a trusted source like the App Store to avoid any security risks.
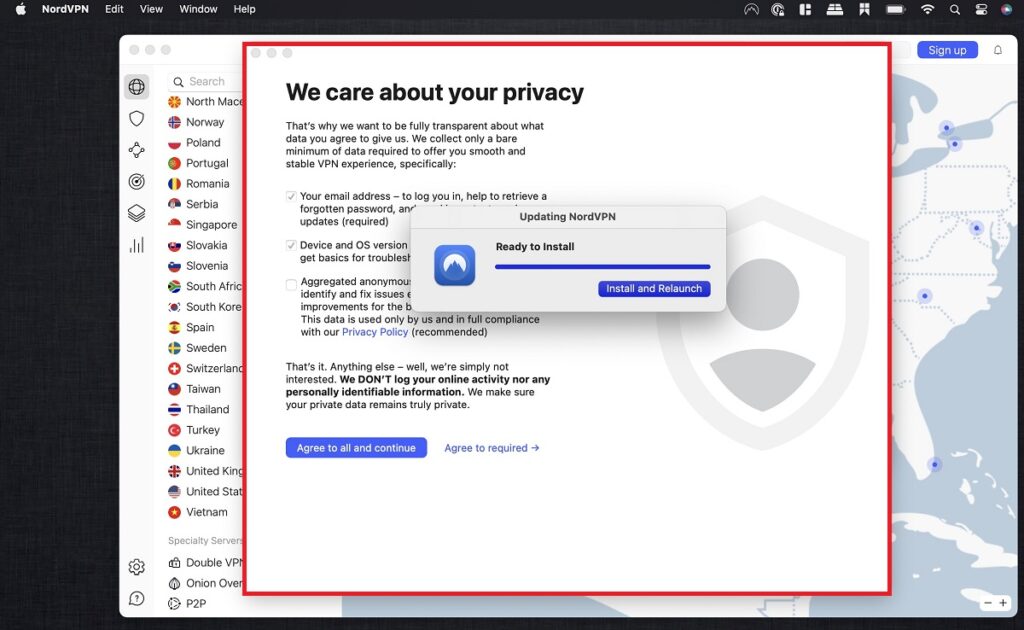
Step 2: Installing the VPN App
Locate the installer file after downloading the VPN app. It's usually in your ‘Downloads' folder. Like all Mac apps, the installer typically comes as a .dmg file for Mac applications. Open this file, and you'll be guided through the installation process.
This usually involves dragging the app icon to your Applications folder. However, the process can vary slightly depending on the VPN provider. Follow the on-screen instructions, and you should have the VPN app successfully installed on your Mac in a few clicks.
Step 3: Setting Up the VPN App
With the VPN app now installed, you're ready to set it up. Open the app from your Applications folder. You'll likely be asked to log in or sign up the first time you open the app. Enter your login details if you've already purchased a subscription from the VPN provider.
Once logged in, you'll typically be presented with a dashboard or control panel. Here, you can select the VPN server you wish to connect to. Most VPN apps will have an ‘auto' or ‘quick connect' option that automatically selects the fastest or most suitable server for you.
However, you can usually also choose a specific server in a specific country. And there you have it! You've set up your VPN using a VPN app on your Mac.
Method 2: Setting Up a VPN Using Mac's Built-In VPN Client
If you're more tech-savvy or prefer not to download additional software, you can set up a VPN connection directly using the built-in VPN client in your Mac's network settings.
It's slightly more complex than a VPN app but gives you more control over your connection. Let's dive into the steps.
Step 1: Gathering VPN Information
Before you can set up the VPN, you'll need essential information from your VPN provider. This typically includes the VPN server address, account name (usually your email address), and password.
Some providers like ExpressVPN may require an authentication setting and a shared secret or certificate. You can usually find these details in the account or settings section of your VPN provider's website.
Step 2: Setting Up the VPN Client
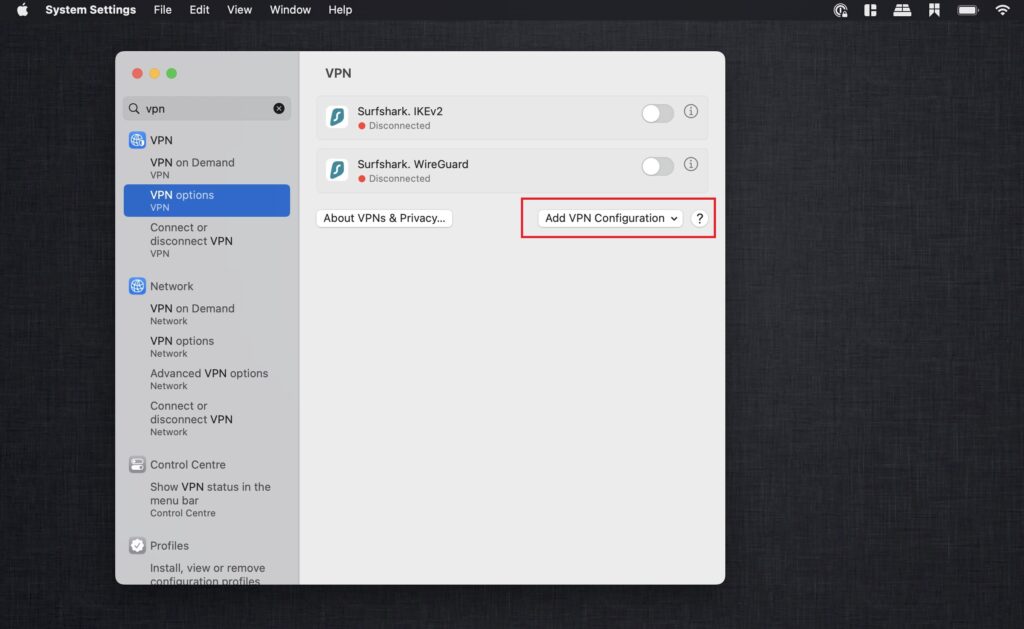
Once you have your VPN information, navigate to ‘System Preferences‘ on your Mac and select ‘Network.'
Click on the ‘+' sign at the bottom left of the ‘Network' window to add a new connection. In the interface that pops up, select ‘VPN' for the interface and the type of VPN your provider uses.
Unfortunately, the macOS built-in VPN tool only supports L2TP over IPSec, IKEv2, and Cisco IPsec. Once you've selected the protocol (we highly recommend IKEv2 in this case, you can set a name for the service in the ‘Service Name‘ field.
Enter the VPN server address and your account name in the relevant fields. If your provider requires it, click ‘Authentication Settings‘ to enter your password, shared secret, or certificate.
Once you've filled in all the necessary fields, click ‘Apply‘ to save the settings.
Step 3: Connecting to the VPN
Now that the VPN is set up, you can connect to it anytime you need. Return to the ‘Network‘ settings, select the VPN you set up, and click ‘Connect.' Voila! You're now connected to your VPN using the built-in VPN client on your Mac.
Method 3: Setting Up a VPN Using OpenVPN Connect
If you're inclined towards a more hands-on approach, setting up a VPN using OpenVPN Connect, the official app from the creators of the OpenVPN protocol, might be the right choice for you.
It's more involved than using a provider's app, but it offers more control over your connection. Here are the steps:
Step 1: Installing OpenVPN Connect
First, you'll need to install the OpenVPN Connect app. Visit the OpenVPN website, navigate to the “Community” section, and choose the “Downloads” page. Download the latest stable release of OpenVPN Connect for macOS.
Once the download is complete, locate the file (usually in your ‘Downloads' folder) and open it. Follow the on-screen instructions to install OpenVPN Connect on your Mac.
Step 2: Configuring OpenVPN Connect
You'll need a configuration file from your VPN provider to configure OpenVPN Connect. These files typically end with the .ovpn extension. They contain the necessary settings for OpenVPN Connect to establish a connection with the VPN server.
You should be able to find these configuration files in the settings or download section of your VPN provider's website. Some providers offer separate .ovpn files for each server, while others might provide a single file that lets you choose the server within the OpenVPN Connect app.
Once you have the .ovpn file, open OpenVPN Connect and click the “File” tab. Click “Import from file…” and locate your .ovpn file. Select the file and click “Open” to import the configuration. You must repeat this process for each VPN server's .ovpn file.
Step 3: Connecting to the VPN
With the configuration file imported, you're now ready to connect. In OpenVPN Connect, you should see the server profile you just imported. Click on the toggle switch beside the profile to initiate the connection.
You'll be asked to enter your username and password (the credentials provided by your VPN service). Once you've entered your login details, click “Connect.” After a few moments, you should be securely connected to your VPN.
Why Do I Need a VPN on My Mac?
You might be wondering, “Why do I need a VPN on my Mac?” After all, macOS is known for its built-in security features.
While it's true that Macs are designed with robust security in mind, a VPN provides an additional layer of protection that extends beyond your device to your online activities. Here's why a VPN is essential for your Mac.
Enhanced Privacy
A VPN, or Virtual Private Network, encrypts all the data you send and receive on your Mac. Third parties, like your Internet Service Provider (ISP), advertisers, or potential hackers, can't easily see what you're doing online or acquire your personal information.
Secure Public WiFi Use
A VPN is essential if you often connect to public WiFi networks at places like coffee shops or airports. Public Wi-Fi networks are typically unsecured, making it easy for malicious actors to intercept your data. A VPN ensures your data is safe even if you're on an unsecured network.
Bypass Geographical Restrictions
If you've ever been blocked from watching a video or accessing a website because of where you live, you've experienced geo-blocking. A VPN allows you to connect to servers in different countries, helping you bypass those geographical restrictions.
Prevent Bandwidth Throttling
ISPs sometimes slow down your internet speed when you consume a lot of data, like streaming or gaming. This is known as bandwidth throttling. Because a VPN encrypts your data, your ISP can't see what you're doing online and thus can't throttle your bandwidth based on your activities.
Even Macs Need More Privacy Than Apple Offers
Using a VPN on your Mac is more than just a tech-savvy move—it's a critical step towards safeguarding your online privacy and security, ensuring more freedom as you navigate the digital world, and enhancing your overall internet experience.
Remember, consistency is the key to getting the most out of your VPN. Make it a habit to connect to your VPN whenever you're online. It might seem like a small step, but it can significantly protect your data and preserve your online anonymity.
As always, if you encounter any hiccups, don't hesitate to reach out for help. Most reputable VPN providers offer robust customer support and have resources to help you troubleshoot any issues.