Among the many VPN solutions available, OpenVPN is a preferred choice for many users. This comprehensive guide will delve into the step-by-step process of OpenVPN server Windows installation and configuration.
By the end of this post, you'll have a fully operational OpenVPN server on your Windows machine and a deeper understanding of VPN technology. So, whether you're a tech enthusiast or a beginner in the world of VPNs, let's embark on this journey together.
What is an OpenVPN Server?
An OpenVPN Server is a VPN server that uses the OpenVPN protocol to create secure, encrypted connections between devices. It's a popular choice for businesses and individuals due to its robust security features and flexibility.
To appreciate what an OpenVPN Server does, it's essential to understand the role of a VPN server. A VPN server is a computer that manages VPN connections and allows your device to become part of its local network.
When you connect to a VPN server, your online traffic is routed through it, and your data is encrypted, enhancing your privacy and security.
Requirements for Installing an OpenVPN Server on Windows
Before we dive into the installation process, ensuring you have everything you need to successfully install and configure an OpenVPN Server on your Windows machine is crucial. YOu don't want to interrupt the process by searching for stuff to download or install.
Here are the prerequisites:
A Windows Machine and Administrative Access
You'll need a computer with a Windows operating system. OpenVPN is compatible with various versions of Windows. Ensure your system is updated with the latest patches and updates.
Installing new software typically requires administrative access to your computer. Ensure you have the necessary permissions to install and configure software on your machine.
Stable Internet Connection
A stable internet connection is crucial for downloading the necessary software and testing your VPN connection. It's also important to note that a VPN can affect your internet speed, so a high-speed connection is recommended.
OpenVPN Software
You'll need to download the OpenVPN software. We'll cover this in more detail in the installation section, but it's good to note that the software is free and can be downloaded from the official OpenVPN website.
Basic Networking Knowledge
While I'll strive to make this guide as beginner-friendly as possible, having some basic understanding of networking concepts such as IP addresses, firewalls, and ports will be helpful. If you're new to these concepts, don't worry! There are plenty of resources online where you can learn the basics.
Time and Patience
Setting up an OpenVPN server on Windows is simple but requires some time and patience. Don't rush the process. If you encounter any issues, take a break, troubleshoot, and remember that the OpenVPN community is an excellent resource for finding solutions.
How to Install OpenVPN Server on Windows
Now that we've covered the prerequisites let's dive into the installation process. Here's a step-by-step guide to installing an OpenVPN Server on your Windows machine:
Step 1. Download the OpenVPN Software and Run The Installer
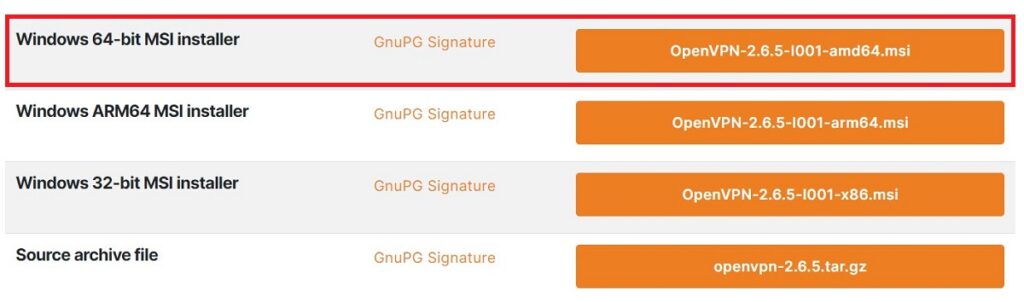
The first step is to download the OpenVPN software. Visit the official OpenVPN website and navigate to the “Community Downloads” page. Here, you'll find the latest version of OpenVPN Community Edition, which is free. Download the Windows installer package.
Step 2. Proceed With The Installation
The wizard will ask you to choose a location on your computer to install OpenVPN. The default location is usually suitable for most users. Click “Install” to begin the installation process.
The wizard will now install OpenVPN on your computer. This process may take a few minutes. The more powerful your computer is, the faster the installation will go. Once the installation is complete, click “Next.”
Finally, you'll see a screen confirming that OpenVPN has been installed. Ensure the “Start OpenVPN GUI” box is checked, and click “Finish.”
How to Configure Your OpenVPN Server on Windows
Now that you've installed OpenVPN Server on your Windows machine, the next step is to configure it. This process involves creating a configuration file that tells OpenVPN how to establish your VPN connection. Here's a step-by-step guide:
Step 1. Create a Configuration File
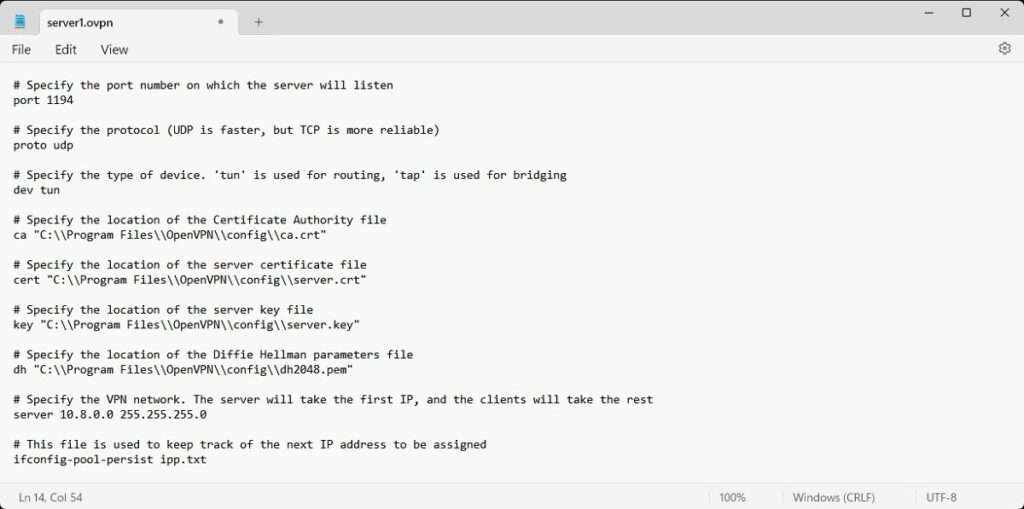
OpenVPN uses configuration files (.ovpn) to determine how to set up the VPN connection. You'll need to create a new text file with the .ovpn extension. You can do this using any text editor, such as Notepad. Save this file in the OpenVPN's configuration directory, typically C:\Program Files\OpenVPN\config.
In the configuration file, you'll need to specify various settings for your VPN server. Here's a basic example of what your configuration file might look like:
# Specify the port number on which the server will listen
port 1194
# Specify the protocol (UDP is faster, but TCP is more reliable)
proto udp
# Specify the type of device. ‘tun' is used for routing, ‘tap' is used for bridging
dev tun
# Specify the location of the Certificate Authority file
ca “C:\\Program Files\\OpenVPN\\config\\ca.crt”
# Specify the location of the server certificate file
cert “C:\\Program Files\\OpenVPN\\config\\server.crt”
# Specify the location of the server key file
key “C:\\Program Files\\OpenVPN\\config\\server.key”
# Specify the location of the Diffie Hellman parameters file
dh “C:\\Program Files\\OpenVPN\\config\\dh2048.pem”
# Specify the VPN network. The server will take the first IP, and the clients will take the rest
server 10.8.0.0 255.255.255.0
# This file is used to keep track of the next IP address to be assigned
ifconfig-pool-persist ipp.txt
# This command pushes the client to redirect all traffic through the VPN
push “redirect-gateway def1 bypass-dhcp”
# These commands push specific DNS servers to the client
push “dhcp-option DNS 208.67.222.222”
push “dhcp-option DNS 208.67.220.220”
# This command helps in case of connection drops
keepalive 10 120
# This command specifies the encryption cipher
cipher AES-256-CBC
# These commands are used to drop privileges
user nobody
group nogroup
# These commands are used to keep the key and tun/tap device across VPN restarts
persist-key
persist-tun
# This command is used to write status to a file
status openvpn-status.log
# This command is used to set the log verbosity
verb 3
You can find ready-made sample configuration files in your OpenVPN directory. This directory is generally under the Program Files (not Program Files x86) folder.
Step 2. Generate Certificates and Keys
OpenVPN uses certificates and keys to secure the VPN connection. You'll need to generate a Certificate Authority (CA) certificate, a server certificate, and a server key. OpenVPN provides easy-rsa, a set of scripts to help you generate these.
If you're using an older version of the OpenVPN server, you can find these scripts in the C:\Program Files\OpenVPN\easy-rsa directory. If not, you have to download them from the GitHub repository.
Step 4. Start the OpenVPN Server
You're ready to start your OpenVPN server once you've created your configuration file and generated your certificates and keys.
Open the OpenVPN GUI by clicking on its icon in your system tray. Right-click the icon and select “Connect.” You should see a message saying the connection has been established if everything is set up correctly.
How to Connect to Your OpenVPN Server
Once you've successfully installed and configured your OpenVPN Server on your Windows machine, the next step is to connect to it. Here's a step-by-step guide:
Step 1. Install the OpenVPN Client
To connect to your OpenVPN Server, you'll need to install the OpenVPN Client on the device you'll be using to connect to the server. This could be another computer, a smartphone, or a tablet.
You can download the OpenVPN Client (OpenVPN Connect) from the official website. Make sure to choose the correct version for your operating system.
Step 2. Generate a Client Configuration File
Like the server, the client also needs a configuration file to connect to the server. You'll need to create a new .ovpn file with the correct settings for your server. This file should include the client certificate, key, and Certificate Authority (CA) certificate.
Once you've created this file, transfer it to the device you'll use to connect to the server.
Step 3. Import the .ovpn File and Connect to Your VPN
On the device you'll use to connect to the server, open the OpenVPN Client and import the .ovpn file you created in the previous step. This will create a new VPN profile.
In the OpenVPN Client, select the VPN profile you just created and click “Connect.” If everything is set up correctly, you can establish a secure connection to your OpenVPN Server.
Tips for Using OpenVPN Server
Now that you've successfully installed, configured, and connected to your OpenVPN Server, here are some tips to help you get the most out of your VPN experience:
Regularly Check for Updates
Like any other software, OpenVPN is regularly updated to introduce new features, improve performance, and fix security vulnerabilities. Remember to check for and install updates to your OpenVPN Server and Client software to ensure the best performance and security.
Monitor Your Server
Keep an eye on your server's performance and usage. This can help you identify any potential issues before they become serious problems. OpenVPN includes several features that can help with this, including status logs and real-time status monitoring.
Secure Your Server
While OpenVPN is secure by default, there are additional steps you can take to enhance your server's security. For example, you can use firewall rules to restrict access to your server, use strong passwords and certificates for authentication, and regularly update and patch your server's operating system.
Optimize Performance
You can tweak several settings to optimize your OpenVPN Server's performance. For example, you can adjust the MTU size, use a faster cipher, or enable compression. However, be aware that some of these settings may also affect the security of your VPN, so it's essential to understand the implications before making changes.
Use a Reliable DNS Provider
When you connect to your VPN, you'll likely use it to access the internet. This means you'll need a reliable DNS provider. While you can use any DNS provider, some are more privacy-focused than others. Do some research to find a provider that fits your needs.
Get Involved in the Community
The OpenVPN community is a great resource for tips, troubleshooting advice, and updates. Be bold, ask questions, and share your experiences. The more involved you are, the more you'll learn.
Troubleshooting Common OpenVPN Server Installation Problems
Even with the most detailed guides, you might encounter issues when installing and configuring your OpenVPN Server. Here are some common problems and their solutions:
Connection Timeout: If you're experiencing connection timeouts, it could be due to a firewall blocking the connection. Check your firewall settings to ensure the port specified in your OpenVPN configuration file is open.
Authentication Failure: Double-check your certificates and keys if you're getting an authentication failure. Ensure they're correctly specified in your configuration file and match on both the server and client sides.
Slow Connection Speeds: If your VPN connection is slower than expected, it could be due to your encryption settings. While more robust encryption provides better security, it can also slow down your connection. Try adjusting your encryption settings to find a balance between speed and safety.
Cannot Access Internet While Connected to VPN: If you can't access the Internet while connected to your VPN, it could be due to your DNS settings. Check your configuration file to ensure you push the correct DNS servers to the client.
Server Does Not Start Automatically on Boot: If your OpenVPN Server doesn't start automatically when your machine boots up, you may need to adjust your system settings to start the OpenVPN service automatically.
Running an OpenVPN Server is Simple and Effective
Setting up an OpenVPN Server on a Windows machine might seem daunting, but it's achievable with the proper guidance and patience. Remember, the OpenVPN community is a fantastic resource for issues or questions.
Whether using your new OpenVPN server to secure your internet connection, access geo-restricted content, or learn more about networking and cybersecurity, you've taken a significant step towards a more secure and private online experience.
Congratulations on setting up your OpenVPN Server on Windows, and here's to many secure browsing sessions in the future!