Hello, fellow digital navigators! Today, I'll walk you through a comprehensive guide on how to set up a VPN on your Windows 11 system. After all, navigating the vast sea of the internet without a VPN is like setting sail on stormy waters without a lifejacket.
Whether you're a seasoned internet surfer or a newbie stepping into the waves of the World Wide Web, this guide provides clear, easy-to-follow steps to secure your online journey. So buckle up, and let's dive right in!
5-Minute Guide: Setting Up a VPN on Windows 11
Step 1: Select a VPN service. Choose a VPN service that best suits your needs. Some popular choices include NordVPN, ExpressVPN, and CyberGhost.
Step 2: Download the VPN client software for Windows. Make sure you're downloading the latest version compatible with Windows 11. Next, run the installer and follow the on-screen instructions.
Step 3: Launch and connect. Launch the VPN client app and sign in using the account you created. Once logged in, you can select a server and connect to it.
There you go – a quick and easy guide to setting up a VPN on Windows 11. As always, make sure to stay safe and secure online, folks!
You can set up a VPN on Windows 11 in several ways, from using a VPN client to employing OpenVPN or even utilizing Windows 11's built-in VPN settings. There's no one-size-fits-all solution here; it's all about finding the method that suits your needs.
So whether you're a tech wizard who loves to tinker or someone who wants a quick, simple setup, I've got you covered. Let's set sail on this digital voyage together!
Option 1. Setting Up a VPN Client With Windows 11

A VPN client application is generally the best way to run your VPN on Windows 11. Individual VPN service providers build these apps, often containing various features. For example, many good VPN client apps now support the Wireguard protocol.
Step 1. Download and Install the VPN Client App
After you've subscribed to a VPN service (I trust you've chosen wisely!), the next step is to download the VPN client for Windows 11 from the service's website. Ensure you have the correct version compatible with Windows 11 to avoid any hiccups.
Once downloaded, it's installation time. Run the installer and follow the prompts. Typically, it's as simple as clicking “Next” a few times and choosing where to install the program.
Step 2. Run The VPN Client
After installing the VPN client, you must set it up. Open the program and sign in with your VPN account credentials. Take a moment to familiarize yourself with the interface. Look for the server selection option – this allows you to choose which country's server you want to connect to.
Once you've selected the server, hit the “Connect” button, and you'll have the service running. You can then minimize the client application and use your Windows 11 computer as normal. The VPN will silently protect you in the background.
There are other optional configurations that most VPN clients also offer. They cover advanced features like a kill switch (which cuts off your internet if the VPN disconnects) or split-tunneling (which lets you decide which apps use the VPN and which don't).
Pro Tip: Set your VPN client to launch and connect to a server automatically when Windows starts. That way, you won't forget to protect your computer with the VPN each time you turn it on.
Option 2. Setting Up a VPN on Windows 11 Using The OpenVPN App
OpenVPN is a popular open-source VPN protocol known for its strong security and reliability. This could be an excellent option if your VPN service supports OpenVPN and you prefer a little more control over your VPN setup.
Step 1. Download and Install The OpenVPN Client
Navigate to the OpenVPN website and download the OpenVPN Connect client. Make sure to select the version that's compatible with Windows 11. Once downloaded, run the installer and follow the prompts to install OpenVPN Connect on your system.
Step 2. Get OpenVPN Configuration Files
Next, you'll need the configuration file(s) for the server(s) you want to connect to. Your VPN service will typically provide these and can usually be downloaded from their website. The files are often in a .ovpn format.
Each OpenVPN configuration file provides the settings for one specific VPN server. Download the configuration files for the server locations you want to use and save them in a location you'll remember.
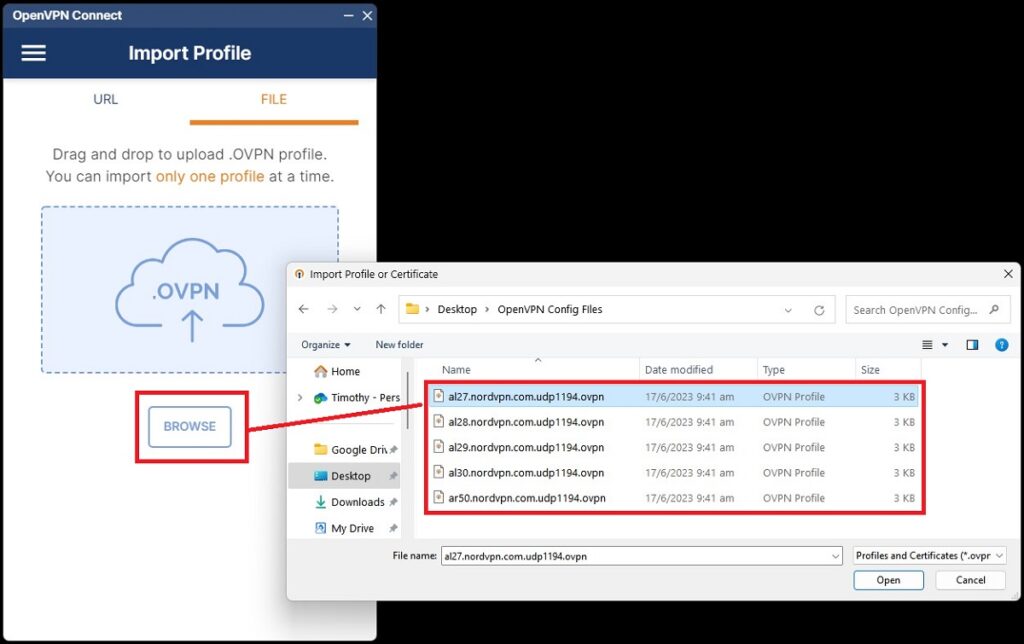
Step 3. Import Files to OpenVPN Connect
Once you have the configuration files, open the OpenVPN Connect client. Click on the “File” tab and “Import from local file.” Navigate to where you saved the configuration files, select one, and click “Open.” Repeat this process for any additional servers you want to add.
Step 4. Connect to The VPN Server
Now you're all set to connect. You'll see a list of the servers you've
added to the OpenVPN Connect client. Simply click “Connect” next to the server you want to use, and you'll be prompted to enter your VPN service username and password. Enter these details, and voila! You're now connected to your VPN via OpenVPN.
Option 3. Setting Up a VPN Using Windows 11's Native VPN Settings
Windows 11, like its predecessors, comes with built-in VPN support. This means you can set up a VPN connection without downloading extra software. Let's explore how you can take advantage of this feature.
Step 1. Gather The Necessary Information
To start, you'll need your VPN server details and your VPN account information. Your VPN service typically provides this information. You'll need the server's address, the type of VPN (such as PPTP, L2TP/IPSec, SSTP, or IKEv2), and your username and password.
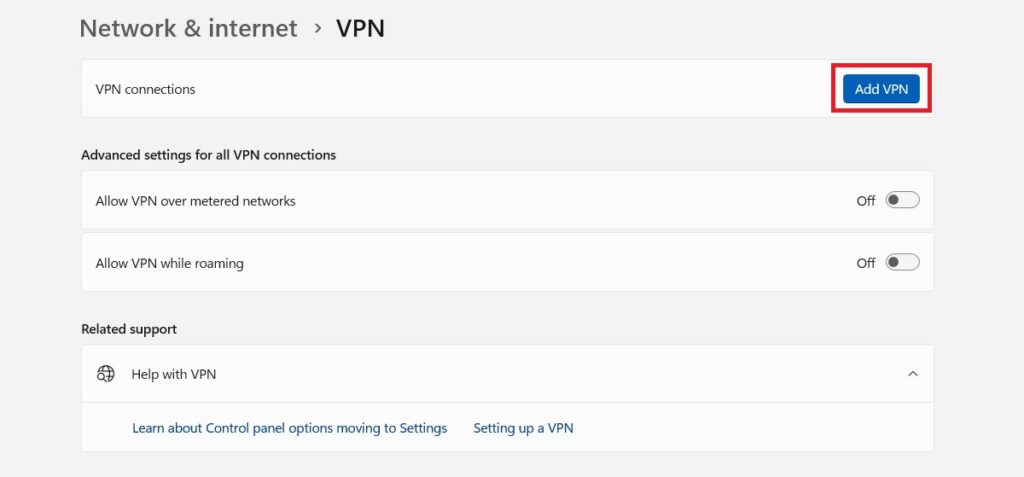
Step 2. Add The VPN to Windows Network Settings
Once you have this information, open the Windows 11 settings by clicking the Start button and then the Settings icon. Go to “Network & Internet” and then “VPN.” Click on “Add a VPN connection.” Next, fill out the information in the “Add a VPN connection” window.
- For “VPN provider,” select “Windows (built-in).”
- In the “Connection name” field, enter a name for the VPN connection – this can be anything you like.
- In the “Server name or address” field, enter the server address provided by your VPN service.
- For “VPN type,” select the type of VPN your VPN service provides.
- For “Type of sign-in info,” select “Username and password.” Then enter your VPN account username and password in the fields provided.
- Finally, click “Save.”
Step 3. Connect The VPN
Return to the “VPN” section in your settings to connect to a VPN server. Select the VPN connection you just created, and click “Connect.” You're now using your VPN through Windows 11's native settings!
Testing Your VPN Connection

Once you've set up your VPN, it's crucial to test the connection to ensure it's working correctly. This isn't just about checking if you can browse the internet while connected to the VPN but also about ensuring the VPN keeps your online activity private.
So, let's go through how you can test your VPN connection on Windows 11.
Check for IP Leaks
First, you should check your IP address. An IP (Internet Protocol) address is a unique string of numbers and decimals that identifies your device on the Internet. When connected to a VPN, your IP address should show the location of the VPN server, not your actual IP address.
To check this, disconnect from your VPN, and search “what is my IP” on a search engine. Note down the IP address and location. Then, connect to your VPN and do the same search again. The IP address and location should now be different. If they are, your VPN is working correctly.
Check for DNS Leaks
Next, you should check for DNS leaks. DNS (Domain Name System) is the system that translates website names (like www.google.com) into IP addresses that your device can understand.
A DNS leak happens when DNS requests are sent outside the VPN tunnel, potentially exposing your browsing activity. You can use several online tools to test for DNS leaks, such as dnsleaktest.com.
Connect to your VPN, go to the site, and follow the instructions for a DNS leak test. If the test shows the servers of your VPN provider and not your ISP, your VPN is not leaking DNS requests.
Test Your VPN Speed
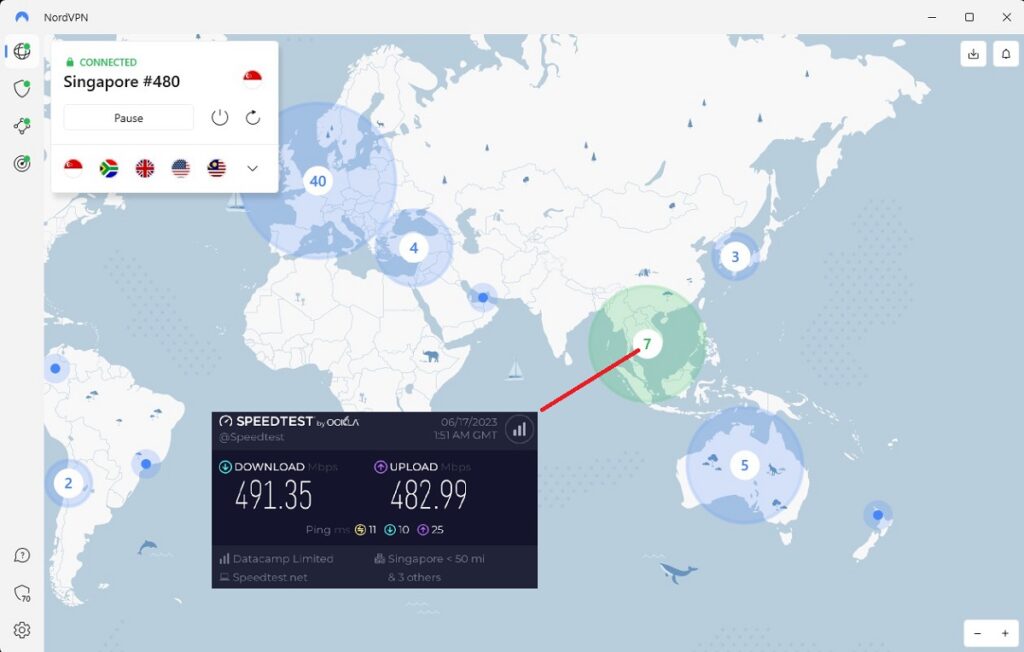
Finally, you should test your VPN's speed. While a VPN can slow down your internet speed due to the extra distance data travels, and the encryption and decryption process, a good VPN should not cause a drastic reduction in speed.
You can test your VPN's speed using online tools like speedtest.net. Do a speed test without the VPN connection and then with the VPN connection active. A slight speed reduction is typical. If the speed is significantly slower with the VPN, you may want to try connecting to a different server.
Read my comprehensive guide on How to Test If Your VPN is Working for more details.
Why Do I Need a VPN on Windows 11?
Some may ask, “Why do I need a VPN on my Windows 11 computer?” A VPN is like a magic cloak that hides your internet activity from prying eyes. It provides an encrypted tunnel for your data, keeping it safe from hackers and even your Internet Service Provider (ISP).
But it's not just about security. A VPN can also bypass geo-restrictions, allowing you to access content that may be blocked in your region. Want to watch a show that's only available on Canadian Netflix, but you're in Australia? A VPN can make it happen.
Furthermore, with Windows 11's new features and interface, ensuring your online privacy is not compromised is essential. Windows 11 integrates more closely with Microsoft's cloud services, which means more of your data is potentially exposed. A VPN helps you take control of your privacy.
Ensuring Secure Internet Usage with VPN on Windows 11
Whether you choose to use a VPN client or the built-in settings on Windows 11, the most important thing is that you're taking steps to secure your online activities. A VPN is a fantastic tool that can provide an extra layer of security and protect your privacy.
While setting up a VPN may seem like a daunting task initially, it's a relatively straightforward process once you get the hang of it. And it's definitely worth the effort considering the numerous benefits a VPN provides.
If you run into any hitches, don't hesitate to reach out to your VPN's customer support. They're there to help ensure your online journey is as secure and private as possible.